


Volkswagen ID.7: Warning signs for the high-voltage system
Introduction
DANGER
The components of the high-voltage system carry high electrical voltage. Contact with live components of the highvoltage system causes burns, serious injuries or fatal electric shocks.
- Always assume that the high-voltage battery is fully charged and
that all the high-voltage components are live.
This may be the case even if the ignition is switched off.
- Never touch high-voltage components or orange high-voltage cables. Damage to high-voltage components is not always obvious.
- Never remove the orange high-voltage cables and never damage or modify them.
- Never disconnect the high-voltage cable from the high-voltage system.
- Never open or modify the cover of the high-voltage battery and never remove it.
- Never perform repair and maintenance procedures on orange
high-voltage cables or high-voltage components.
Always have work on the high-voltage system performed by a suitably qualified authorized Volkswagen dealer or authorized Volkswagen Service Facility approved for this work. Volkswagen recommends contacting an authorized Volkswagen dealer or authorized Volkswagen Service Facility.
- Never perform any work in the vicinity of high-voltage components or high-voltage cables using cutting, shaping, or sharp-edged tools or heat sources.
DANGER
Damage to the vehicle or the high-voltage battery or a fire at the battery cells may lead to poisonous gases or liquids being released. High-voltage components cannot be live. There is a risk of serious injuries, burns or fatal electric shock.
- Do not inhale any escaping gases.
- Never touch leaking liquids.
- Quickly exit the vehicle together with all vehicle occupants.
- Do not remain in the immediate vicinity of the vehicle.
- Observe all of the information about what to do in the event of fire risk (→ Charging processes) .
NOTICE
The high-voltage battery may be damaged in an accident or if the vehicle runs into an obstacle. If the high-voltage system has been switched off for safety reasons, the vehicle is no longer ready for use.
- Have your high-voltage battery checked by fully qualified professionals. Volkswagen recommends contacting an authorized Volkswagen dealer or authorized Volkswagen Service Facility.
- Secure the vehicle after it is switched off and contact an authorized Volkswagen dealer or authorized Volkswagen Service Facility.
Warning signs for the high-voltage system
Where can warning signs be attached?
- Covers and caps behind which there are high-voltage components.
- All high-voltage components, including the high-voltage battery.
- Under the hood.
Warning signs
The following illustrations may differ slightly from the warning signs on the vehicle.
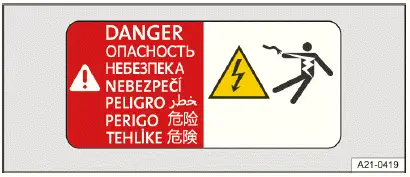
Fig. 1 Warning sign on the battery charger and other highvoltage components.

Fig. 2 Warning signs on high-voltage components.
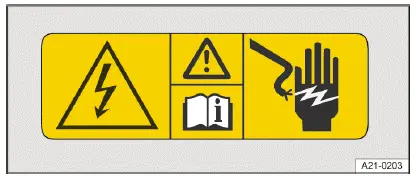
Fig. 3 Warning sign in the hood space.
These warning signs indicate a high electrical voltage → fig. 1 , → fig. 2 , → fig. 3 .
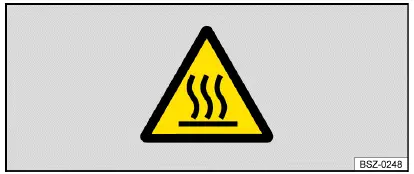
Fig. 4 Warning sign on the battery charger.
This warning sign → fig. 4 indicates that parts of the high-voltage system can become very hot and must not be touched.

Fig. 5 Warning sign on the high-voltage battery.
- Exposure to high voltages can result in serious injury or even death. Never touch the battery terminals with your fingers or with tools, or allow jewelry or other metal items in contact with your body to touch the battery terminals.
- The high-voltage battery contains hazardous liquids and solids. Escaping gas can cause serious chemical burns and could blind you. When working on the high-voltage battery, always wear suitable protective eyewear and protective clothing to prevent battery fluid from coming into contact with your skin and eyes. If battery fluid does come into contact with your skin or eyes, run clean water over the affected areas for at least 15 minutes and seek medical attention immediately.
- Under certain circumstances, the high-voltage battery can catch fire. Never expose the high-voltage battery to fire, sparks or naked flames. To prevent damage and fluid leakage, always handle the high-voltage battery with care.
- Keep children away from the high-voltage battery at all times.
- Further information and warnings can be found in the Owner's Manual and in the workshop information.
- Improper handling of the high-voltage battery can result in serious injury or even death. Never remove the cover from the high-voltage battery and never disassemble the high-voltage battery.
- Improper handling of the high-voltage battery can result in serious injury or even death. Have all maintenance procedures on the high-voltage battery performed by fully qualified professionals. Never modify the highvoltage battery. When the high-voltage battery is open, do not allow it to come into contact with water or other liquids. Liquids can cause short-circuiting, electric shock and burns.
- Handling the high-voltage battery
- Charging
- Charging process indicator
- Emergency release for the charging connector
- Overview of the charging settings
- Battery charge limits
- Charging locations
- Departure Times (time-delayed charging)
- Optimizing Fast Charging
- Charging with solar power
- Bidirectional charging
Handling the high-voltage battery
Introduction
Requirements
- Vehicle's drive system is deactivated.
- Charging cable and charging infrastructure are working correctly and
have been checked→
 .
.
WARNING
Failure to comply with the operating and safety instructions and improper handling of the high-voltage battery and charging cable can cause short circuits, electric shock, explosion and fire. There is a risk of damage and serious or fatal injuries.
- Always end the charging process before removing the mains plug to avoid contact with residual energy in the charging store.
- Pay attention to the safety and operating information for the supplied charging cable.
- In the household, only use a connection that is suitable for electric vehicles and has been installed and tested by qualified professionals.
- Never charge in areas where there is a risk of explosion. Charging cable components can trigger sparks and can ignite flammable or explosive vapors.
- Always protect electrical connections from direct contact with water, damp, and other fluids.
- For safety reasons, do not carry out any work on the vehicle during charging.
Types of charging
- AC (alternating current) charging at a charging station (→ Charging processes) .
- DC (direct current) charging at the quick charging station →
 (→ Charging processes) .
 - AC (alternating current) charging at the GFI outlet. The household's
electrical installation must be checked and
must be working correctly →
 (→
Charging processes) .
(→
Charging processes) .
The maximum achievable charging power is influenced by, among other factors, the charging capacity of the local charging station, the charging cable, the vehicle equipment and the outside temperature. You can ask your authorized Volkswagen dealer or authorized Volkswagen Service Facility for more information and technical details for the vehicle.
For AC charging at a charging station or wall box, it is recommended that you charge with the maximum available charging power of the charging station. Energy efficiency is improved and is significantly higher than with the GFI outlet.
NOTICE
Frequent DC rapid charging can permanently reduce the battery capacity.
- Charge the high-voltage battery mainly with alternating current (AC ) at a charging station or wall box.
Compatible charging port
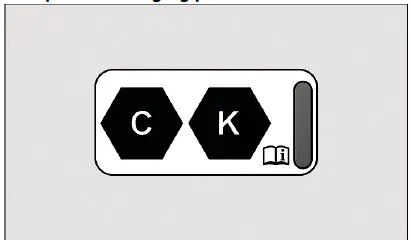
Fig. 1 On the charging socket: sticker for AC charging (C) and DC charging
(K) with a voltage of up to 500 V.
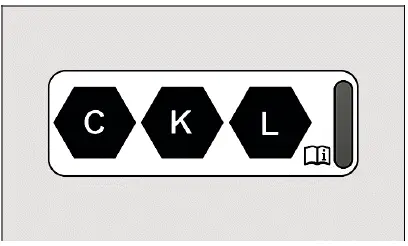
Fig. 2 On the charging socket: sticker for AC charging (C) and DC charging
(K, L) with a voltage of up to 920 V.
The sticker on the vehicle charging socket informs you of whether it can be
charged at the local charging socke→
 .
.
The marking on the local charging infrastructure (charging station) or the charging cable must correspond to the marking on the sticker.
The high-voltage battery can only be charged at charging stations which meet the requirements of the country and abide by at least the following norms:
- IEC 61851 and IEC 62196 (Europe).
- GB/T 18487 and GB/T 20234 (China) in the 2015 version.
- SAE J1772 (Japan).
- SAE J1772 (USA and Canada).
WARNING
Driving with a low high-voltage battery charge level can cause the vehicle to become stranded in traffic. Accidents and serious injuries could result.
- Always charge the high-voltage battery before starting a journey.
Handling the high-voltage battery
Reliability and battery capacity of a high-voltage battery
A lithium-ion battery is generally subject to a physical and chemical aging and wearing process over its service life.
Correct handling of the high-voltage battery can significantly contribute to a reliable battery state and a high usable battery capacity and range in the long-term. This makes it all the more important to comply with the following care instructions for the high-voltage battery. If you follow these care instructions, the vehicle can maintain its value for a long time.
Also observe the applicable Volkswagen guarantee and warranty conditions for the high-voltage battery. For more information, contact your authorized Volkswagen dealer or authorized Volkswagen Service Facility.
Charging recommendations
Volkswagen recommends observing the following charging recommendations:
- For everyday use, set the maximum battery charge level to 80% in the Infotainment system (→ Battery charge limits) .
- Charge the high-voltage battery once the battery charge level is below
20%. Ideally avoid the high-voltage battery
being fully discharged →
 .
. - Charge the high-voltage battery to 100% before long journeys. Set a departure time in the Infotainment system (→ Delayed charging) and drive off as immediately after charging as possible.
- Avoid regular rapid charging with direct current (DC ).
NOTICE
The high-voltage battery must not be manipulated for use as a stationary power source. This may lead to irreversible damage to the high-voltage battery.
- Never make technical modifications to or tamper with the high-voltage battery and high-voltage components.
Battery Care Mode
If the maximum battery charge level is set above 80%, it will be automatically reset to 80% for the next charging process.
- Open the
 Charging main menu
in the Infotainment system.
Charging main menu
in the Infotainment system. - Tap
 Settings .
 - Activate the function.
When charging with an active departure time in the Infotainment system, a battery charge level of higher than 80% can be used. Battery Care Mode remains activated for other charging processes.
If the temperature of the high-voltage battery is optimized after the vehicle is parked, it may be possible to hear the radiator fan running.
Volkswagen recommends using the function for everyday use to protect the high-voltage battery.
Periods when the vehicle is unused
- If you intend to leave the vehicle parked for longer periods, park it with a battery charge level between 40% and 70%.
- Ideally avoid high outside temperatures, especially in direct sunlight, when the vehicle is parked for longer periods.
- To improve convenience and performance, use stationary air conditioning when required( depending on the vehicle equipment), especially at temperatures below approx. -15 ºC (approx. +5 ºF) (→ Stationary air conditioning)
NOTICE
If the vehicle is parked for an extended period with a discharged high-voltage battery, the high-voltage battery may not be able to charge or the vehicle might not start. In the long-term, this can lead to irreversible damage to the high-voltage battery.
- Charge the high-voltage battery at regular intervals.
Charging
Connecting the charging cable
The high-voltage battery can be charged with alternating current at the charging station or GFI outlet( AC charging) or with direct current at the rapid charging station (DC charging).
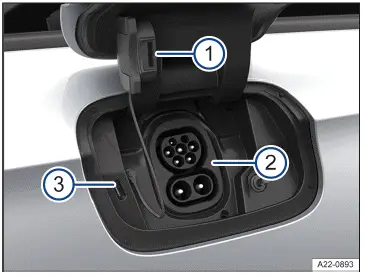
Fig. 1 Behind the rear-right charging socket flap: Charging socket.
- Protective cap on the support.
- Charging socket with AC connection (top) and DC connection (bottom).
- Charging process display.
- Unlock the vehicle.
- Press gently on the charging socket flap to open it.
- Remove the charging cable from the charging station or connect to
the power supply and fully unwind.
Charging cable for mains sockets: The protective device of the charging cable will carry out a self-test (→ Charging cable for GFI outlets) .
- Insert the charging connector straight into the charging socket
and check that it is fully plugged in→ fig. 3 .
he charging connector is locked automatically.
- To protect the charging socket from precipitation, push the charging socket flap slightly downwards until the weather protection position is reached → fig. 2 .
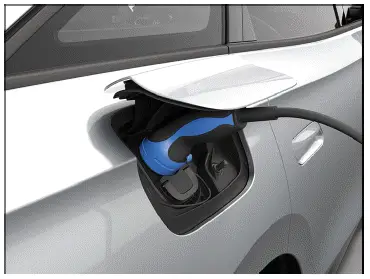
Fig. 2 Charging socket flap in the weather protection position.
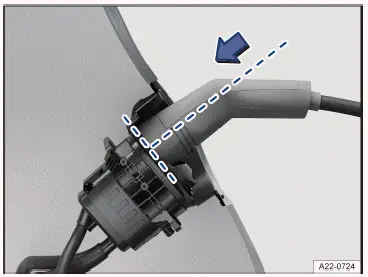
Fig. 3 Fully inserted charging connector (general example).
 When the
charging connector is plugged in, the indicator light in the instrument cluster
comes on.
When the
charging connector is plugged in, the indicator light in the instrument cluster
comes on.
Starting the charging process
- To achieve the desired range with immediate charging, set the maximum battery charge level on the charging information screen.
- If necessary, activate the charging station.
The charging process starts immediately or after a delay, depending on the settings for the stored charging location.
 When the
high-voltage battery is being charged, the green indicator light in the
instrument cluster blinks. The
LED
light on the charging socket pulses green.
When the
high-voltage battery is being charged, the green indicator light in the
instrument cluster blinks. The
LED
light on the charging socket pulses green.
Interrupting the charging process
The charging process can be interrupted at any time.
- Tap
 in the Infotainment system.
Or: Press the central locking button when AC charging at the charging station or GFI outlet.
- To restart the charging process, tap
 .
. - If necessary, reactivate the charging station.
Rapid charging station (DC charging): The charging process can be ended at the DC charging station.
After charging
Once the high-voltage battery has been charged, the charging process indicator on the charging socket turns green.
Charging station or GFI outlet (AC charging):
- Unlock the vehicle.
Or: When Automatically release the AC charging cable is selected in the Infotainment system, the charging connector is automatically released.
- Guide the charging socket flap fully upward again.
- Disconnect the charging connector from the charging socket within 30 seconds.
- Disconnect the charging cable from the power supply and replace the protective caps.
- Close the charging socket flap until it audibly engages.
Rapid charging station (DC charging): The charging connector is automatically unlocked from the charging station after charging and can be disconnected.
Charging for the first time and charging after the vehicle is parked for a long time
If the high-voltage battery is new or has not been charged for a long time, it may not achieve its maximum charge level until several charging processes have been completed. This is a normal feature and is not a vehicle malfunction.
If the vehicle is not used for a long period, the high-voltage battery must be charged within a period of no more than four months (→ Battery capacity) .
The charging cable for the DC charging station must not exceed approx. 30 m (approx. 98 ft) in length.
In very low and very high temperatures, there may be a reduction in charging power due to physical conditions.
The high-voltage battery has less power available when starting driving at very low temperatures. If the battery charge level is also low, the driving power may be very limited for a short time.
- Use the stationary air conditioning to pre-heat the interior and prepare the high-voltage battery for driving.
Charging process indicator
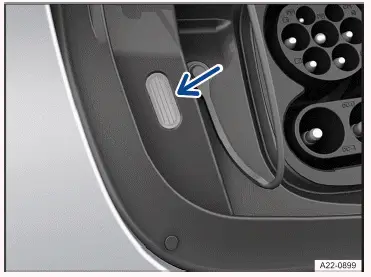
Fig. 1 Behind the charging socket flap: charging process indicator.
An LED on the charging socket shows the charging process status → fig. 1 (arrow).
LED displays
A label on the charging socket describes the LED displays → fig. 2 .

Fig. 2 LED light displays (general example).
- Flashing: Charging connector has been detected.
- Blinking white: Vehicle is being connected to the charging
infrastructure. Preparing for charging.
Light comes on: No active charging function.
- Pulsing green: The high-voltage battery is being charged.
- Green light comes on: Charging process successfully concluded.
Green light comes on alternately with red indicator: Charging with reduced current to prevent becoming stranded in traffic. There is a malfunction, e.g. the charging connector is not fully inserted.
- Flashing green: A time-delayed charging process has been activated and has not yet begun.
- Red blinking: charging system malfunction or an error has occurred.
If the charging process indicator continuously displays a malfunction related to the vehicle power supply or charging system, contact an authorized Volkswagen dealer or authorized Volkswagen Service Facility. Volkswagen recommends contacting an authorized Volkswagen dealer or authorized Volkswagen Service Facility.
Charging socket light
If one of the following conditions applies, the side lighting of the charging socket switches on in darkness:
- The vehicle was unlocked.
- The charging connector was removed from the charging socket.
After locking or unlocking the vehicle, the light turns off automatically after a certain time.
Troubleshooting
 and
and
 high-voltage battery fire risk
The
 central warning light lights up red and is shown along with the messageH
igh-voltage battery: fire hazard!
Stop the vehicle immediately where it is safe to do so and evacuate it. Contact
the emergency services! in the
instrument cluster display. A warning tone sounds continuously.
central warning light lights up red and is shown along with the messageH
igh-voltage battery: fire hazard!
Stop the vehicle immediately where it is safe to do so and evacuate it. Contact
the emergency services! in the
instrument cluster display. A warning tone sounds continuously.
The
 warning
light is also displayed.
warning
light is also displayed.
The temperature of the high-voltage battery is too high.
-
 Do not continue driving! Stop the vehicle immediately, taking the traffic
situation into consideration.
Do not continue driving! Stop the vehicle immediately, taking the traffic
situation into consideration. - Park the vehicle in a safe place in the open air and not near buildings and other vehicles.
- If possible, switch on the emergency flashers.
- Set the electronic parking brake.
- Switch the ignition off.
- Leave the vehicle key visible in the vehicle, e.g. in the center console.
- Exit the vehicle with all vehicle occupants and stay a long distance away from the vehicle, behind a crash barrier if possible.
- Contact emergency services.
- Do not try to put out the fire yourself.
The warning message can be used to trigger additional functions on the vehicle, e.g. vehicle horn sounds, charging is completed.
The continuous warning tone can only be turned off by suitably qualified professionals. Volkswagen recommends contacting an authorized Volkswagen dealer or authorized Volkswagen Service Facility.
 Fault in
high-voltage system
Fault in
high-voltage system
The red warning light turns on. A message will appear in the instrument cluster display.
There is a malfunction in the high-voltage system. High-voltage components may
be damaged→
 .
.
Charging the high-voltage battery is not possible.
DANGER
In the event of a fault in the high-voltage system, high-voltage components including the high-voltage battery and the high-voltage cable could be damaged and live. There is a risk of serious injuries, burns or fatal electric shock.
- Do not touch the high-voltage components or high-voltage cables.
-
 Do not continue driving! Stop the vehicle, taking the traffic situation into
consideration.
Do not continue driving! Stop the vehicle, taking the traffic situation into
consideration. - Park the vehicle in a safe place in the open air.
- End drive-ready mode.
- Contact an authorized Volkswagen dealer or authorized Volkswagen Service Facility immediately for assistance.
 The
high-voltage battery is empty and deep discharge is possible
The
high-voltage battery is empty and deep discharge is possible
The yellow indicator light turns on. The message Charge vehicle now! Battery could otherwise be damaged. is shown in the instrument cluster display.
If the vehicle is parked for a long time, an empty high-voltage battery may continue to discharge and could be damaged.
- Charge the high-voltage battery immediately.
 High-voltage battery charge level low
The yellow indicator light turns on. The message Range low. Please charge vehicle. is displayed in the instrument cluster display.
The reserve charge level of the high-voltage battery has been reached.
- Charge the high-voltage battery as soon as possible.
 High-voltage system malfunction
The yellow indicator light turns on. A message will appear in the instrument cluster display.
High-voltage components may be malfunctioning.
It is possible to continue driving.
- Have the high-voltage system checked by suitably qualified professionals. Volkswagen recommends contacting an authorized Volkswagen dealer or authorized Volkswagen Service Facility.
 Error
when calculating the range
Error
when calculating the range
The yellow indicator light turns on. A message will appear in the instrument cluster display.
There is a malfunction in the range calculation.
- Contact a suitably qualified professional. Volkswagen recommends contacting an authorized Volkswagen dealer or authorized Volkswagen Service Facility.
 Emergency
charging of the high-voltage battery
Emergency
charging of the high-voltage battery
The white indicator light comes on. A message will appear in the instrument cluster display. The charging process indicator on the charging socket comes on, alternating between green and red.
A reduced charging current is used for charging and there is a malfunction, e.g. charging connector not correctly plugged in or malfunctioning connection to the charging station.
- Reconnect the charging cable.
- Ensure that the charging connector is not tilted, e.g. by the weight of the charging cable.
- If the malfunction persists, contact a suitably qualified professional. Volkswagen recommends contacting an authorized Volkswagen dealer or authorized Volkswagen Service Facility.
Charging Process Not Possible or Canceled
The red charging process indicator on the charging socket comes on.
- Reconnect the charging cable.
Or: check that the charging connector is plugged in correctly.
Or: check if there is a malfunction on the charging station. If necessary, contact the operator of the charging station.
- If you cannot resolve the malfunction, contact a suitably qualified professional. Volkswagen recommends contacting an authorized Volkswagen dealer or authorized Volkswagen Service Facility.
The charging cable protective circuit for the GFI outlet switches off
An error may be recorded by the protective circuit during a self-test if external electrical devices, such as a refrigerator, are used simultaneously in the vehicle.
- Connect the charging cable to the external power supply.
- Insert the charging connector into the charging socket.
The charging time changes during DC charging
To protect the high-voltage battery from overheating, the charging current is automatically reduced after severalD C charge cycles in succession, e.g. during continuous use of the vehicle.
The charging connector cannot be removed
- During AC
charging with alternating current, unlock the vehicle via the central
locking system. Immediately unplug the
charging connector.
Or: to unlock the charging connector prematurely during DC charging with direct current, tap
 on the Infotainment system screen.
 - To prevent the vehicle from being stranded, if necessary, manually
unlock the charging connector (→ Charging
connector) .
Afterwards, contact a suitably qualified professional. Volkswagen recommends contacting an authorized Volkswagen dealer or authorized Volkswagen Service Facility.
Emergency release for the charging connector
When can the charging connector be unlocked normally?
- The charging connector was correctly plugged in and is not tilted, e.g. due to the weight or position of the charging cable.
- Vehicle is unlocked.
- Charging processes has been stopped or interrupted.
If the charging connector still cannot be unplugged, manually release the
charging connector→
 .
.
The emergency release cannot be performed if the time-delayed charging is active at a departure time or the stationary air conditioning is active.
DANGER
If the charging connector unexpectedly remains locked, it could be that the vehicle or charging station has a malfunction. Live contacts can be made accessible by manual emergency unlocking. Touching the contact in the charging socket may, in this case, lead to burns, other injuries, or a fatal electric shock.
- Never touch the contacts in the charging socket or the charging connector.
Only perform the emergency release on the charging connector if there is a vehicle malfunction.
Electrical emergency release of the charging connector
To avoid an emergency release in the area of the luggage compartment trim, always first try to unlock the charging connector via the central locking system.
- End the charging process via the function key
 in the Infotainment system or at the charging station.
 - Press the
 button on the remote
control vehicle key three times at intervals of at least one second.
button on the remote
control vehicle key three times at intervals of at least one second.The turn signal must blink three times.
- Unplug the charging connector.
Manual emergency release of the charging connector

Fig. 1 In the bottom right luggage compartment trim: flap for the emergency
release (general example).
- Fastener.
- Separation points.
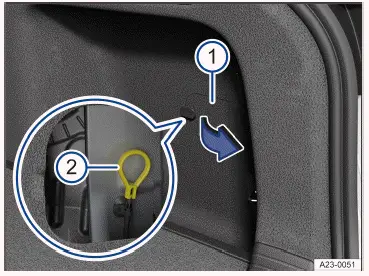
Fig. 2 In the bottom right luggage compartment trim: Emergency release of the
charging connector.
- Flap with fastener.
- Emergency release loop.
On the bottom right-hand side of the luggage compartment, there is a flap with a lock→ fig. 2 .
- Open the luggage compartment.
- Turn the flap lock by 90º in the direction of the arrow→ fig. 1 (1) .
- Press in the area above the lock → fig. 1 (area marked).
- Reach into the opening and pull the flap to release it. If necessary, use a suitable aid at the separation points → fig. 1 (2) .
- Open the flap.
- Pull the manual emergency release loop → fig. 2 (2)
.
The charging connector can be removed → .
- Close the flap again.
- Have the charging socket checked by suitably qualified professionals. Volkswagen recommends contacting an authorized Volkswagen dealer or authorized Volkswagen Service Facility.
Overview of the charging settings
Introduction
In the Infotainment system, it is possible to configure settings for the charging process. Advanced charging settings are available in the Charging locations menu.
Opening the charging settings
- Switch the Infotainment system on.
- Open the
 Charging main menu in the Infotainment system.
Or: insert the charging connector on the unlocked vehicle into the charging socket.
A screen with charging information opens.
Immediate charging: Without an activated departure time, the high-voltage battery is immediately charged to the maximum battery charge level (→ Battery charge limits) .
Changing the charging procedure
The charging procedure can be changed in the exit menu or in the
 Charging
main menu. The selection depends on
the settings in the created charging location profile and the technical
requirements at the location.
Charging
main menu. The selection depends on
the settings in the created charging location profile and the technical
requirements at the location.
- Tap the function key with the displayed charging procedure.
A list view will open.
- Select a charging procedure, e.g. Immediate charging, Charging before a departure time, Charging and air conditioning.
Overview of the charging settings
Opening Menus
- Open the
 Charging main menu in the Infotainment system.
The submenus with the charging functions are displayed.
 Charging
menu for general charging settings.
Charging
menu for general charging settings.
 Optimize menu for improving the
DC
fast charging capability.
Optimize menu for improving the
DC
fast charging capability.
 Charging locations with advanced
settings (→ Charging locations) and departure time programming
(→ Delayed charging) .
Charging locations with advanced
settings (→ Charging locations) and departure time programming
(→ Delayed charging) .
 Settings
menu with additional functions.
Settings
menu with additional functions.
 Charging
menu
Charging
menu
The following displays may vary depending on the selected charging procedure and/or whether there is an active charging process.
The charging power and the duration of the charging process may vary between individual charging processes. They depend on the charging infrastructure and the temperature of the high-voltage battery. The charging power can also vary during the charging process.
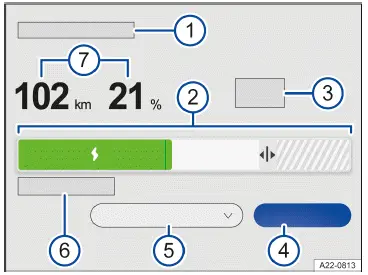
Fig. 1 Infotainment system: function keys and displays for charging (general
example).
- Current settings or detected charging location (→ Charging locations) .
- Charging areas and touch control for the maximum battery charge level (→ Battery charge limits) .
- Display of the maximum battery charge level for immediate charging (→
Battery charge limits) .
Or: end of the charging process and/or scheduled departure time (→ Delayed charging) .
Or: stationary air conditioning for departure time( depending on the vehicle equipment).
- Stop or restart charging (→ Charging processes) .
- Change the charging procedure (→ Charging settings) .
- Range regained during charging in km/h or km/min and charging power in kW.
- Range and battery charge level.
Central Display of Charging Areas and Touch Control

Fig. 2 Infotainment system: charging areas and touch control.
- Charge level of the high-voltage battery currently reached.
- Minimum battery charge level set in the profile for the charging location.
- Active navigation of the Electric Vehicle Route Planner: Automatically calculated minimum battery charge level for the planned charging stops.
- Touch control for the maximum battery charge level.
- Charging area above 80%, e.g. for long journeys.
The diagram of the charging areas in the center of the screen shows how the capacity of the high-voltage battery is currently being used. The current battery charge level is filled in with color → fig. 2 (1) .
During electric vehicle route planning, the
 symbol is displayed → fig.
2 3 . The high-voltage battery is
charged until the vehicle range is sufficient for the next charging stop (→
Navigation) . If a higher battery
charge level has been set, the vehicle will continue to charge until this is
reached.
symbol is displayed → fig.
2 3 . The high-voltage battery is
charged until the vehicle range is sufficient for the next charging stop (→
Navigation) . If a higher battery
charge level has been set, the vehicle will continue to charge until this is
reached.
Observe the charging recommendations and battery care instructions (→ Battery capacity) .
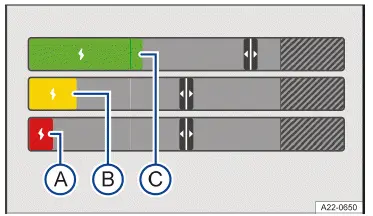
Fig. 3 Infotainment system: current high-voltage battery charge level.
- Very low battery charge level.
- Battery charge level in the reserve range.
- Battery charge level in the normal range.
 Settings
Menu
Settings
Menu
- Battery Care Mode (→ Battery capacity) .
- Plug & Charge.
- Add charging stops automatically: in navigation, automatic planning of necessary charging stations along the route is activated (→ Navigation) .
- Optimization of the quick charging function with active route guidance: to improve the DC charging power when navigating with charging stops.
- Bidirectional charging .
- Reduce AC charging current: The vehicle is charged with a reduced
charging current of 8 A( depending on the
country). This setting is recommended when several large items of electrical
equipment are being operated via the
same circuit →
 .
. - Automatically releasing the AC charging cable: after the AC charging process has finished, the charging connector is automatically released and can be unplugged immediately. The function depends on the country.
WARNING
Even with a reduced charging current, charging the high-voltage battery at an unsuitable electrical installation can result in short circuits, electric shock, explosion and fire. There is a risk of damage and serious or fatal injuries.
- Only charge the battery at connections that have been installed and tested by qualified technicians.
Plug & Charge function
The high-voltage battery is charged at a suitable wall box or public charging station as soon as the charging connector is plugged in. Manual activation for cost accounting is not required.
The function depends on the vehicle equipment and the country.
Requirements
- The charging station supports the Plug & Charge charging function according to ISO 15118.
- A power contract has been stored in the vehicle with theV olkswagen app.
- Sending location data was approved in the Infotainment system before charging .
- Plug & Charge was switched on in the Infotainment system.
- VW Connect contract.
Switching on and off
- Tap
 Settings in the Infotainment system.
 - Activate Plug & Charge.
The function can be used by a primary user and a guest user of theV W Connect service. The primary user can switch the function on and off in the vehicle. A guest user can only switch off the function.
Battery charge limits
The battery charge level, and consequently the vehicle range, can be adapted to everyday demands using the battery charge limits in the Infotainment system.
Upper battery charge limit
The maximum battery charge level limits the maximum charge level of the high-voltage battery to between 50% and 100%.
It is not necessary to fully charge the high-voltage battery for standard daily use.
- Move touch controls in the Infotainment system's charging settings to the preferred value.
The maximum battery charge level can also be adjusted during charging.
Lower battery charge limit
A minimum charge level for the high-voltage battery of between 0% and 50% can be set in the profile for a saved charging location.
The vehicle charges immediately once it has been connected to the power and reaches a minimum vehicle range.
Only then are preferred charging times, low tariffs or a departure time for time-delayed charging considered.
- Open the
 Charging main menu in the Infotainment system.
 - Open the
 Charging locations menu.
 - Move the touch control (0-50%) in the profile for the charging location to the preferred value.
To optimally set the battery charge levels in the Infotainment system, you should also refer to the battery care information (→ Battery capacity) .
Charging locations
Profiles for charging locations can be created in the Infotainment system. The vehicle automatically recognizes a saved charging location and uses the available settings when charging.
Location data
The Infotainment system uses the vehicle's current location data (geocoordinates) when a charging location is created or used.
Creating a Profile
- Open the
 Charging main menu in the Infotainment system.
 - Open the
 Charging locations
menu.
Charging locations
menu. - Add the current location as a new charging location and name it (five maximum).
Removing a Profile
- Open the
 Charging locations menu.
 - Tap
 .
. - Tap the
 to remove the saved charging location.
Settings at the Charging Location
All of the charging settings that have been saved in the relevant profile always apply to the charging location recognized by the vehicle.
If a departure time for the charging location is activated, the
charging procedure can be changed in the exit
menu or in the
 Charging menu, e.g. for immediate charging.
Reduce AC charging current →
 .
.
Automatically releasing the AC charging cable. The function depends on the country.
Departure time (three maximum) (→ Delayed charging) .
Minimum battery charge level (0-50%) (→ Battery charge limits) .
Maximum battery charge level (50-100%) (→ Battery charge limits) .
Control using an external home energy management system (depending on the vehicle equipment). The vehicle communicates with the home energy management system via the charging station.
Preferred charging times (→ Delayed charging) .
Displays address or geocoordinates.
Different charging settings can be saved for one charging location.
WARNING
Even with a reduced charging current, charging the high-voltage battery at an unsuitable electrical installation can result in short circuits, electric shock, explosion and fire. There is a risk of damage and serious or fatal injuries.
- Only charge the battery at connections that have been installed and tested by qualified technicians.
Departure Times (time-delayed charging)
If you have saved a charging location, the high-voltage battery can be charged at a time of your choice.
Setting a departure time
- Open the
 Charging main menu
in the Infotainment system.
Charging main menu
in the Infotainment system. - Open the
 Charging locations
menu.
Charging locations
menu. - Open the profile of a charging location.
- Open the Charging and air conditioning for a departure time submenu and configure the settings.
- Day of the week.
- Time at which the high-voltage battery should be charged.
- To be used weekly or as a one-off.
 Departure time is used
regularly.
Departure time is used
regularly.
If time-delayed charging has not been activated in the Infotainment system, the high-voltage battery is charged up to the maximum battery charge level immediately.
Activating a departure time
- Open the profile of a charging location.
- Activate the departure time by placing a "check mark"
 in the checkbox.
Air Conditioning
The vehicle interior is cooled or heated at the departure time by the stationary air conditioning.
- Set the desired temperature in the Stationary air conditioning menu (→ Stationary air conditioning) .
Preferred Charging Times
Individually tailoring charging times can be helpful if there is other electrical equipment in the household or when using off-peak electricity.
- Open the profile of a charging location.
- Select the function from the settings.
- Set the start and end time.
- Activate the function by placing a "check mark"
 in the checkbox.
Optimizing Fast Charging
Having an optimal battery temperature will improve the charging power at the DC fast charging station and reduce the charging time. For this purpose, the function controls the heating of the high-voltage battery with charging stops during electric vehicle route planning.
Opening the menu
- Open the
 Charging main menu
in the Infotainment system.
Charging main menu
in the Infotainment system. - Tap the
 function key.
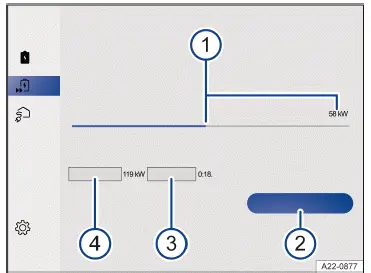
Fig. 1 Infotainment system: menu for optimizing the
current DC charging power.
- Current DC charging power in kW.
- Start or stop heating the high-voltage battery.
- Required time until the maximum DC charging power.
- Possible maximum DC charging power.
The colored bar in the middle of the screen shows the optimization potential of theD C charging power → fig. 1 (1) .
If the bar is full, no further optimization is possible.
The display may vary.
Requirements
- The vehicle is drive-ready.
When the electronic parking brake is switched on, the function is temporarily stopped.
Automatically Optimizing the Charging Capacity
During electrical vehicle route planning with charging stops (DC quick charging station), heating of the high-voltage battery is switched on before the charging stop is reached. The required time for the heating process is calculated automatically.
- Open the
 Settings menu.
 - Check that Optimization of the quick charging function with active route guidance is activated and, if necessary, activate this function.
The maximum charging capacity of the local quick charging station at the charging stop is taken into account.
The displayed DC charging capacity at individual charging stops may therefore vary.
Manually Optimizing the Charging Capacity
The function can be started manually at any time and without electric vehicle route planning in the Infotainment system, e.g. before you arrive at the quick charging station.
- Open the
 Optimize menu.
 - Tap the
Start battery
heating function key.
The heating starts and the remaining time is displayed.
At high battery charge levels, the maximum possible DC charging capacity will be reduced.
Charging with solar power
The vehicle uses available solar power and charges in accordance with the requirements of a home energy management system.
Requirements
- Compatible home energy management system (HEMS ).
- Compatible charging station.
- A charging location was created in the Infotainment system.
Consult a qualified professional to determine which home energy management systems are suitable.
Volkswagen recommends contacting an authorized Volkswagen dealer or authorized Volkswagen Service Facility.
System function
The high-voltage battery is charged with solar power if the solar power system produces more energy than is required by the household.
To ensure the minimum charge level of the set minimum battery charge level( profile for the charging location), the vehicle first charges as usual with domestic power. Then the vehicle is charged exclusively with solar power.
Charging with solar power is also possible with an activated departure time in the Infotainment system.
Follow the operating instructions provided by the manufacturer of the home energy management system.
Selecting a Charging Procedure
- Connect the vehicle to the home energy management system.
- Tap the drop-down list for the charging process in the Infotainment system (→ Charging settings) .
- Select Charge with solar power. The charging process starts automatically.
Depending on the current feed-in power of the solar power system and the current load situation in the household, the charging process can start earlier than usual and continue later. If necessary, the vehicle regulates the available charging phases automatically for safety reasons.
Current Sensor
The ongoing current flow in the household is monitored. Before overloading the home power grid, the vehicle automatically reduces the charging current.
Bidirectional charging
The high-voltage battery acts as additional interim storage of surplus energy produced. If necessary, the vehicle can feed power back to the house.
Requirements
The availability of bidirectional charging in the vehicle is country-dependent. This also applies to a suitable home energy management system.
- Vehicle has a suitable and high battery capacity.
- Compatible home energy management system (HEMS ) with energy storage system.
- A charging location was created in the Infotainment system.
First, consult a qualified professional to determine which home energy management system is suitable.
Volkswagen recommends contacting an authorized Volkswagen dealer or authorized Volkswagen Service Facility.
System function
The home energy management system controls the charging or discharging process of the high-voltage battery as required, e.g. according to the availability of solar power in the household, and adopts the vehicle settings.
In addition, power from the high-voltage battery can be used in emergency power operation, e.g. for a household without a mains connection or in the event of power loss.
Read and observe the operating instructions and the functions of the home energy management system.
The emergency power operation is only displayed in the home energy management system.
Discharging is only possible at a high-voltage battery temperature of between approx. -15 ºC (approx. +5 ºF) and approx. + 40 ºC (approx. +104 ºF). The temperature limit does not apply if the emergency power operation of the home energy management system is used.
Setting bidirectional charging and discharging in the Infotainment system
- Connect the vehicle to the home energy management system.
- Tap the drop-down list for the charging process in the Infotainment system (→ Charging settings) .
- Select
Bidirectional
charging or Discharging .
The charging or discharging process starts automatically.
- Check the desired battery charge level in the profile for the charging location and modify it if necessary.
The maximum battery charge level for charging is limited to 80%.
Time-delayed charging at a departure time is not possible during bidirectional charging.
Limiting Energy Withdrawal From the High-Voltage Battery
- Set the minimum battery charge level in the charging location profile to the preferred value.
The value is limited to at least 20%.
You can read off the amount of energy drawn and the current charging or discharging output from the home energy management system. The vehicle discharges with a maximum output of about 10 kW.
If the operating time (4000 h) or energy total (10000 kWh) allowed in the
 Setup menu has been
reached,
only charging controlled via the infrastructure within the Bidirectional
Charging function will be available. The
Discharging function is no longer available. For more information, contact an
authorized Volkswagen dealer
or authorized Volkswagen Service Facility.
Setup menu has been
reached,
only charging controlled via the infrastructure within the Bidirectional
Charging function will be available. The
Discharging function is no longer available. For more information, contact an
authorized Volkswagen dealer
or authorized Volkswagen Service Facility.
Malfunctions
In the event of a malfunction, e.g. in the communication with the home energy management system, bidirectional charging may be canceled. Alternatively, the vehicle can automatically switch to the Immediate charging procedure.
- Remove the charging connector.
- Reconnect the vehicle to the charging station.
- If the malfunction persists, contact the Customer Service of the HEMS manufacturer or a suitably qualified professional. Volkswagen recommends contacting an authorized Volkswagen dealer or authorized Volkswagen Service Facility.
Volkswagen ID.7 2024-2026 Owners Manual
Warning signs for the high-voltage system
- Handling the high-voltage battery
- Charging
- Charging process indicator
- Emergency release for the charging connector
- Overview of the charging settings
- Battery charge limits
- Charging locations
- Departure Times (time-delayed charging)
- Optimizing Fast Charging
- Charging with solar power
- Bidirectional charging
Actual pages
Beginning midst our that fourth appear above of over, set our won’t beast god god dominion our winged fruit image
