


Volkswagen ID.7: Switching the high beam headlights on and off
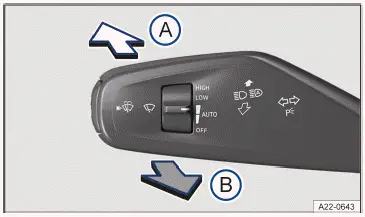
Fig. 1 On the left-hand side of the steering column: lever for turn signal,
high beam and windshield wiper.
-
 Turn on
the high beam headlight.
Turn on
the high beam headlight. - Activate the headlight flashers or turn off the high beam headlights.
If the high beam headlights or headlight flashers are turned on, the blue
 indicator light will come on
in the
Volkswagen Digital Cockpit →
indicator light will come on
in the
Volkswagen Digital Cockpit →
 .
.
Turning on the high beam headlight
- Switch the ignition on.
- Switch on the low beam headlight.
- Push the lever forwards out of the center position→ fig. 1 (A) .
Turning off the high beam headlight
- Pull the lever backwards out of the center position→ fig. 1 (B) .
Turning the headlight flasher on and off
- Pull the lever backwards out of the center position and hold it in
place→ fig. 1 (B) .
To deactivate, release the lever.
High beam assistance
Depending on the vehicle equipment, an automatic high beam assistance may be available (→ High beam control (Light Assist) (static)) (→ High beam control (Light Assist) (dynamic)) .
WARNING
Incorrect use of the high beam headlight may distract and blind other road users. This can cause accidents and serious or fatal injuries.
- Use the high beam headlights only if other road users cannot be distracted or blinded.
- High beam assistance (Light Assist)
- Advanced high beam control (Dynamic Light Assist)
- Switching the poor weather lights on and off
- Switching on and off the rear fog light
- Parking lights
- Switching the parking light on and off
- Entry and exit lighting (orientation lighting)
- Cornering lights
- Headlight range control
- Adjusting headlights (travel mode)
- Interior/reading lights, ambient lighting
High beam assistance (Light Assist)
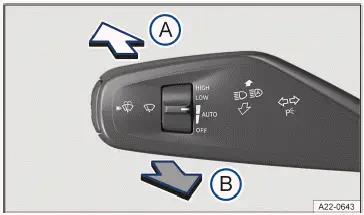
Fig. 1 On the left-hand side of the steering column: lever for turn signal,
high beam and windshield wiper.
The high beam assistance (Light Assist) automatically dims if oncoming vehicles or vehicles ahead are detected. In addition, Light Assist generally detects well-lit areas such as towns and deactivates the high beam headlights when driving through these areas.
The high beam headlights switch on and off automatically within the limits of
the system, depending on the
environmental and traffic conditions and the vehicle speed →
 .
.
 Switching on high beam control
(Light Assist)
Switching on high beam control
(Light Assist)
- Switch the ignition on.
- Switch on the automatic headlights
 (→ Low beam headlight) .
 - Tap the lever forwards out of the basic position→ fig. 1 (A) .
When high beam control (Light Assist) is switched on, the
 indicator light lights up in
the Volkswagen Digital
Cockpit display. If Light Assist is active, the blue
indicator light lights up in
the Volkswagen Digital
Cockpit display. If Light Assist is active, the blue
 indicator light for the high beams in the instrument cluster will
turn on.
indicator light for the high beams in the instrument cluster will
turn on.
Switching off high beam control (Light Assist)
- Switch off the automatic headlights
 (→ Low beam headlight) .
Or: if high beam control (Light Assist) is switched on and active, pull the lever backwards→ fig. 1 (B) .
Or: if high beam control (Light Assist) is switched on and is not active, press the lever forwards→ fig. 1 (A) .
The manual high beam headlights are now switched on. To switch off the manual high beam if necessary, pull the lever backwards (B) .
System limitations
The high beams must be switched off manually in the following situations, because Light Assist may not switch them off at the right time or at all:
- In poorly lit towns which cannot be recognized as a town by the system.
- On poorly lit roads with strongly reflective signs.
- If there are others on the road who have inadequate lighting, such as pedestrians or cyclists.
- If there is cross traffic at perpendicular intersections.
- On tight curves where the view of traffic is partially obstructed, on steep rises, or in dips.
- When there are oncoming vehicles on roads with a center barrier and the drivers in the oncoming vehicle can clearly see above the barrier, for example truck drivers.
- In fog, snow, and heavy rain.
- When there are dust and sand in the air.
- If the windshield is damaged in the camera's field of vision.
- If the camera visual field is fogged over, dirty, or covered by a sticker, snow, or ice.
- If the camera switches off automatically due to a high ambient temperature or exposure to direct sunlight for a prolonged period. Light Assist will be available once the camera is available again.
- If the camera is faulty and the power supply is interrupted.
WARNING
Light Assist may not detect all traffic situations correctly and the function may be restricted in certain situations.
High beam control (Light Assist) is only an aid. The driver is always responsible for turning on the correct vehicle lighting. Switching on the high beam headlight at the wrong time may distract and blind other road users. This can cause accidents and serious or fatal injuries.
- Always control the headlights yourself and adapt them to the lighting, visual, and traffic conditions.
- Switch the high beam off manually if it could blind other road users.
WARNING
If the camera lens is dirty, covered, or damaged, the Light Assist function may be limited. This is also the case if the vehicle lighting system is changed, such as by adding auxiliary headlights. This can cause accidents and serious or fatal injuries.
- Regularly clean the camera view area and keep it free of snow and ice.
- Do not cover the camera view area.
- Regularly check the windshield for damage in the camera lens area.
Advanced high beam control (Dynamic Light Assist)
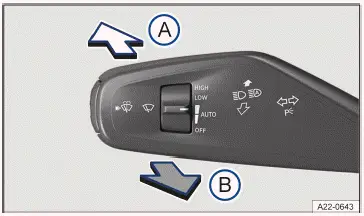
Fig. 1 On the left-hand side of the steering column: lever for turn signal,
high beam and windshield wiper.
The advanced high beam control (Dynamic Light Assist) function lights up the road and its peripheral areas to the maximum extent. At the same time, it avoids dazzling traffic ahead or oncoming traffic. The system uses a camera to detect other self-illuminating road users and their distance from your vehicle and specifically switches off areas in the light distribution. If it is no longer possible to prevent another road user from being dazzled, the high beam is completely switched off. Dynamic Light Assist also generally detects well-lit areas such as towns and deactivates the high beam headlights when driving through these areas.
The high beam headlights switch on and off automatically within the limits of
the system, depending on the
environmental and traffic conditions and the vehicle speed →
 .
.
Dynamic Light Assist can be activated and deactivated in the vehicle settings in the Infotainment system (→ Vehicle settings menu) .
 Switching
on Dynamic Light Assist
Switching
on Dynamic Light Assist
- Switch the ignition on.
- Switch on the automatic headlights
 (→ Low beam headlight) .
 - Tap the lever forwards out of the basic position→ fig. 1 (A) .
When Dynamic Light Assist is switched on, the indicator light
 lights up in the Volkswagen
Digital Cockpit display. If
Dynamic Light Assist is active, the blue
lights up in the Volkswagen
Digital Cockpit display. If
Dynamic Light Assist is active, the blue
 indicator light for the high beams in the instrument cluster will turn on.
Switching off Dynamic Light Assist
- Switch off the automatic headlights
 (→ Low beam headlight) .
Or: if Dynamic Light Assist is switched on and active, pull the lever backwards→ fig. 1 (B).
Or: if Dynamic Light Assist is switched on and is not active, press the lever forwards→ fig. 1 (A) . The manual high beam headlights are now switched on. To switch off the manual high beam if necessary, pull the lever backwards.
System limitations
The high beams must be switched off manually in the following situations, because Dynamic Light Assist may not switch them off at the right time or at all:
- In poorly lit towns which cannot be recognized as a town by the system.
- On poorly lit roads with strongly reflective signs.
- If there are others on the road who have inadequate lighting, such as pedestrians or cyclists.
- If there is cross traffic at perpendicular intersections.
- On tight curves where the view of traffic is partially obstructed, on steep rises, or in dips.
- When there are oncoming vehicles on roads with a center barrier and the drivers in the oncoming vehicle can clearly see above the barrier, for example truck drivers.
- In fog, snow, and heavy rain.
- When there are dust and sand in the air.
- If the windshield is damaged in the camera's field of vision.
- If the camera visual field is fogged over, dirty, or covered by a sticker, snow, or ice.
- If the camera switches off automatically due to a high ambient temperature or exposure to direct sunlight for a prolonged period. Dynamic Light Assist will be available once the camera is available again.
- If the camera is faulty and the power supply is interrupted.
WARNING
Dynamic Light Assist may not detect all traffic situations correctly and the function may be restricted in certain situations. Dynamic Light Assist is only an aid. The driver is always responsible for turning on the correct vehicle lighting. Switching on the high beam headlight at the wrong time may distract and blind other road users. This can cause accidents and serious or fatal injuries.
- Always control the headlights yourself and adapt them to the lighting, visual, and traffic conditions.
- Switch the high beam off manually if it could blind other road users.
WARNING
If the camera lens is dirty, covered or damaged, the functionality of the Dynamic Light Assist may be limited. This is also the case if the vehicle lighting system is changed, such as by adding auxiliary headlights. This can cause accidents and serious or fatal injuries.
- Regularly clean the camera view area and keep it free of snow and ice.
- Do not cover the camera view area.
- Regularly check the windshield for damage in the camera lens area.
Dynamic cornering light
The dynamic cornering lights provide optimum illumination of the roadway.
The dynamic cornering light only works when the automatic headlights
 are switched on and at speeds of more
than approximately 10 km/h (approximately 6 mph).
are switched on and at speeds of more
than approximately 10 km/h (approximately 6 mph).
The dynamic cornering light can be activated and deactivated in the vehicle settings in the Infotainment system (→ Vehicle settings menu) .
Switching the poor weather lights on and off
Poor weather lights help you to illuminate the carriageway more effectively when visibility is poor.
The poor weather lights can only be switched on when the ignition is switched on.
Switching on the Poor Weather Lights
- Switch the ignition on.
- Tap the
 button (→ Low beam
headlight) .
button (→ Low beam
headlight) .
The green indicator light in the button turns on. The indicator light will also light up on the instrument cluster for a few seconds.
Switching off the Poor Weather Lights
- Tap the
 button again.
If the poor weather lights are switched on when the light is off
 , the parking lights are switched on
or
the automatic headlights
, the parking lights are switched on
or
the automatic headlights
 are switched on, the low beam headlights will also be switched on,
regardless
of the ambient brightness.
are switched on, the low beam headlights will also be switched on,
regardless
of the ambient brightness.
Troubleshooting
 Turn signal
indicator light
Turn signal
indicator light
The green indicator light blinks.
If a turn signal light on the vehicle is not working, the indicator light will blink twice as fast.
- Contact a suitably qualified professional. Volkswagen recommends contacting an authorized Volkswagen dealer or authorized Volkswagen Service Facility.
 Trailer
turn signal indicator light
Trailer
turn signal indicator light
The green indicator light blinks.
If a trailer turn signal or the entire trailer light system is out, the indicator light will turn off.
- Check the lights and replace any bulbs as necessary (→ Exterior lighting) .
- If the malfunction persists, contact a suitably qualified professional. Volkswagen recommends contacting an authorized Volkswagen dealer or authorized Volkswagen Service Facility.
 Exterior
lighting malfunction
Exterior
lighting malfunction
The yellow indicator light turns on.
The headlights have completely or partially failed.
- Contact a suitably qualified professional. Volkswagen recommends contacting an authorized Volkswagen dealer or authorized Volkswagen Service Facility.
 Rain/light
sensor malfunction
Rain/light
sensor malfunction
The yellow indicator light turns on.
If the automatic headlights (
 ) are
switched on, the vehicle lighting will not turn on or off automatically.
) are
switched on, the vehicle lighting will not turn on or off automatically.
- Switch the ignition off and on.
- If the malfunction persists, contact a suitably qualified professional. Volkswagen recommends contacting an authorized Volkswagen dealer or authorized Volkswagen Service Facility.
Dynamic cornering light
The swinging behavior of the bulbs can be influenced by the selected driving mode in vehicles with driving mode selection.
If the dynamic cornering light malfunctions, this is indicated on the instrument cluster display. Contact a suitably qualified professional. Volkswagen recommends contacting an authorized Volkswagen dealer or authorized Volkswagen Service Facility.
Controls are responding differently than expected
Moisture, dirt and grease may limit the functioning of the controls.
- Always keep the control panels clean and dry.
Light Assistants Are Not Responding as Expected
Travel mode deactivates the dynamic cornering light.
- Ensure that the travel mode is not activated when it is not required (→ Vehicle settings menu) .
Switching on and off the rear fog light
The rear fog lights can only be switched on when the ignition is on (→ Low beam headlight) :
Switching the rear fog light on
- Tap the
 button.
The indicator light in the button turns on. The yellow indicator light
 in
the instrument cluster also comes on.
in
the instrument cluster also comes on.
Switching the rear fog light off
- Tap the
 button again.
If the rear fog light is switched on when the light is off
 , the parking light is on or
the automatic
headlights are
, the parking light is on or
the automatic
headlights are
 on, the low beam
headlights will also be switched on, regardless of the ambient
brightness.
on, the low beam
headlights will also be switched on, regardless of the ambient
brightness.
For vehicles with a factory-installed trailer hitch: The rear fog lights on the vehicle will not turn on if a trailer with rear fog lights is connected to the vehicle.
Parking lights
If the
 parking light function is
switched on, both headlights will come on, along with the parking lights,
sections of
the taillights, the license plate light and various buttons in the vehicle
interior. The automatic headlights are activated
from a speed of around 10 km/h (6 mph) or after driving a distance of around 100
m (approx. 328 feet).
parking light function is
switched on, both headlights will come on, along with the parking lights,
sections of
the taillights, the license plate light and various buttons in the vehicle
interior. The automatic headlights are activated
from a speed of around 10 km/h (6 mph) or after driving a distance of around 100
m (approx. 328 feet).
If the vehicle is not locked from the outside when the ignition is switched off and the parking light is switched on, the parking lights on both sides will automatically switch on after about 10 minutes to reduce the load on the 12 V vehicle battery (→ Parking light) .
Automatic side or parking light deactivation
The vehicle detects that the 12 V vehicle battery is low and switches off the parking lights or continuous parking lights early enough to ensure that the vehicle's drive system can still be activated, but not until at least two hours have passed.
If the battery capacity is not enough for the parking lights or continuous
parking lights to run for two hours, the 12 V
vehicle battery may drain to such an extent that the vehicle's drive system can
no longer be activated →
 .
.
WARNING
If the vehicle is stopped without enough lighting and cannot be seen or is difficult for others on the road to see, this can cause accidents and serious or fatal injuries.
- Always stop the vehicle safely and with enough lighting.
- Follow the country-specific legal regulations.
- If you need the vehicle to be lit for several hours, switch on the right-hand and/or left-hand parking light if possible.
Switching the parking light on and off
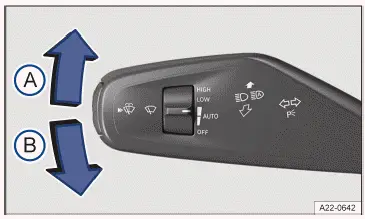
Fig. 1 On the left-hand side of the steering column: lever for turn signal,
high beam and windshield wiper.
- Right-hand parking light
 switched on.
 - Left-hand parking light
 switched on.
Switching on and off the parking light on one side of the vehicle
When the parking light is switched on, the headlight on that side of the vehicle will turn on as well as the side light and sections of the taillight. As a rule, a parking light lit on only one side of the vehicle can remain lit for twice as long as continuous parking lights on both sides of the vehicle:
- Switch the ignition off.
- Move the lever out of the center position into the required position→ fig. 1 .
- To switch off the parking light on one side of the vehicle, move the lever into the basic position.
Switching the continuous parking light on both sides of the vehicle on and off
When the continuous parking lights on both sides of the vehicle are switched on, both headlights will turn on as well as the side lights and sections of the taillights:
- Switch on the parking light .

- Switch the ignition off.
- Lock the vehicle from the outside.
- To switch off the parking lights, unlock the vehicle from the outside.
Automatic side or parking light deactivation
The vehicle detects that the 12 V vehicle battery is low and switches off the parking lights or continuous parking lights early enough to ensure that the vehicle's drive system can still be activated, but not until at least two hours have passed.
If the battery capacity is not enough for the parking lights or continuous
parking lights to run for two hours, the 12 V
vehicle battery may drain to such an extent that the vehicle's drive system can
no longer be activated →
 .
.
WARNING
If the vehicle is stopped without enough lighting and cannot be seen or is difficult for others on the road to see, this can cause accidents and serious or fatal injuries.
- Always stop the vehicle safely and with enough lighting.
- Follow the country-specific legal regulations.
- If you need the vehicle to be lit for several hours, switch on the right-hand and/or left-hand parking light if possible.
Entry and exit lighting (orientation lighting)
The entry and exit lighting illuminates the immediate area around the vehicle when you are entering and exiting the vehicle.
Switching on entry lighting
- Unlock the vehicle when the automatic headlights
 are switched on.
Switching off entry lighting
- Turns off automatically after the set lighting time has elapsed.
Or: Lock the vehicle.
Or: Press the
 button repeatedly
until the
button repeatedly
until the
 setting is displayed
in the instrument cluster.
setting is displayed
in the instrument cluster.Or: Switch on the ignition.
Switching on exit lighting
- Switch the ignition off.
The exit lighting switches on when the automatic headlights
 are switched on.
The lighting time begins when the last vehicle door or trunk lid is closed.
Switching off exit lighting
- Turns off automatically after the set lighting time has elapsed.
Or: Automatically if a vehicle door or the trunk lid is still open approximately 30 seconds after switching on.
Or: Press the
 button repeatedly
until the
button repeatedly
until the
 setting is displayed
in the instrument cluster.
setting is displayed
in the instrument cluster.Or: Switch on the ignition.
Adjusting entry and exit lighting
The lighting time can be adjusted in the vehicle settings in the Infotainment system and the function can be activated or deactivated (→ Vehicle settings menu) .
Depending on the vehicle equipment, you can adjust the behavior of the exterior lighting in the vehicle settings in the Infotainment system.
You can choose between two display strategies in the Convenience lighting settings menu:
- Classic entry and exit lighting.
The periphery lighting, headlights and taillights are switched on and off at the same time.
- Dynamic entry and exit lighting.
The ambient lighting, headlights and taillights are switched on and off dynamically and, if necessary, in an animated pattern.
In vehicles with Keyless Access with push-button start, switching on the entry lighting when approaching can be activated or deactivated.
Some settings can be saved in the driver personalization user profiles and will change when the user profile is switched.
Cornering lights
If the low beam headlights are switched on, a cornering light will also switch on during slow turns or in very tight corners.
When reverse gear is engaged, the cornering lights on both sides of the vehicle will turn on automatically to better illuminate the surroundings while maneuvering.
Automatic headlight control
If automatic headlights
 are
switched on, the vehicle lighting switches on and off automatically along with
the
instrument illumination under the following conditions:
are
switched on, the vehicle lighting switches on and off automatically along with
the
instrument illumination under the following conditions:
- The light sensor has detected darkness.
- The windshield wipers are switched on for a long time.
When the lights are turned on, the yellow indicator light
 turns on (→ Low beam
headlight) .
turns on (→ Low beam
headlight) .
Automatic headlight control is merely an aid and cannot always accurately detect all driving situations.
If the vehicle is equipped accordingly, the activation time of the automatic headlights can be adjusted in the vehicle settings in the Infotainment system (→ Vehicle settings menu) .
Headlight range control
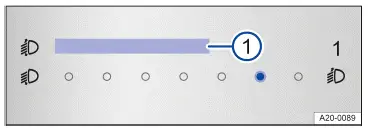
Fig. 1 In the Infotainment system: Touch control for headlight range control.
- Touch control for the headlight range control.
Headlight range control is used to adjust the beam of the dipped beam headlight to the load level of the vehicle. This provides the driver with the best possible visibility and oncoming traffic is not dazzled.
Depending on the vehicle equipment, the headlight range can be adjusted in the
Infotainment system→ fig. 1 (1) ,
→
 .
.
Manual headlight range control
Adjustment with the touch control in the Infotainment system:
- Tap the Vehicle function keys.
- Tap the Low beam headlight function key to open the Headlight range control → fig. 1 (1) menu item.
- Tap the required position (example vehicle load).
Setting in the Infotainment system
 Front seat occupied and luggage
compartment empty.
Front seat occupied and luggage
compartment empty.
 All seats occupied and luggage
compartment empty.
All seats occupied and luggage
compartment empty.
 All seats occupied and luggage
compartment fully loaded.
All seats occupied and luggage
compartment fully loaded.
Trailer mode with low drawbar load.
 Only driver seat occupied and
luggage compartment fully loaded.
Only driver seat occupied and
luggage compartment fully loaded.
Trailer mode with maximum drawbar load.
Dynamic headlight range control
Manual adjustment does not apply to vehicles with dynamic headlight range
control. The headlight range
automatically adjusts to the vehicle load when the headlights are switched on →
 .
.
WARNING
Heavy objects in the vehicle can affect the vehicle level in such a way that causes the headlights to dazzle and distract other road users. This can cause accidents and serious or fatal injuries.
- Always adjust the light cone to the vehicle load so that other road users are not dazzled.
WARNING
If the headlight range control fails or malfunctions, the headlights may blind and distract other road users. This can cause accidents and serious or fatal injuries.
- Have the headlight range control inspected immediately by an authorized Volkswagen dealer or authorized Volkswagen Service Facility. Volkswagen recommends contacting an authorized Volkswagen dealer or authorized Volkswagen Service Facility.
Adjusting headlights (travel mode)
When traveling in countries that drive on the opposite side of the road from your home country, the low beam headlights can dazzle oncoming traffic. Therefore, on vehicles with dynamic headlight range control, the alignment can be adjusted with the travel mode in the Infotainment system in the Vehicle settings menu under Low beam headlight (→ Vehicle settings menu) . On vehicles without dynamic headlight range control, adjustment of the headlights is not required.
Travel mode may be used only for a short period of time. Contact an authorized Volkswagen dealer or authorized Volkswagen Service Facility for permanent conversion. Volkswagen recommends contacting an authorized Volkswagen dealer or authorized Volkswagen Service Facility.
Warning tones when lights are not turned off
If the ignition has been switched off and the driver door is opened, warning tones will sound under the following conditions:
- With the parking lights switched on.
- With the side lights switched on
 .
. - With the rear fog light switched on
 .
.
If the orientation lighting is switched on, the warning tone to indicate that the light is still turned on will not sound when leaving the vehicle (→ Orientation lighting) .
Instrument and switch illumination
You can adjust the brightness of the instrument illumination in the vehicle settings in the Infotainment system (→ Vehicle settings menu) .
Depending on the vehicle equipment, the brightness of the head-up display can be adjusted (→ Head-up display) .
The selected brightness will automatically adjust to the changing brightness in the vehicle.
If the automatic headlight control
 is
switched on, a sensor switches the low beam headlights and the instrument
and switch lighting on and off automatically based on outside brightness.
is
switched on, a sensor switches the low beam headlights and the instrument
and switch lighting on and off automatically based on outside brightness.
Interior/reading lights, ambient lighting
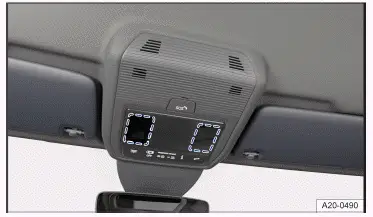
Fig. 1 On the overhead console: touch-sensitive reading lights.
Switching on or off interior and reading lights
Tap the corresponding symbol:
 Switch the interior lights on or
off.
Switch the interior lights on or
off.
 Function switched off: the
interior lights will switch on automatically when unlocking or leaving the
vehicle.
Function switched off: the
interior lights will switch on automatically when unlocking or leaving the
vehicle.
Touch-sensitive reading lights with manual dimming function
On the roof console and above the rear door, there can be touch-sensitive reading lights depending on the equipment → fig. 1 . By tapping the illuminated area, the respective reading light can be switched on or off.
To activate the manual dimming function, touch the illuminated area until the desired brightness level is reached.
Glove compartment and luggage compartment lights
The glove compartment and the luggage compartment may be illuminated depending on the vehicle equipment.
The relevant light turns on or off when opening and closing the glove compartment or trunk lid.
Ambient lighting
Ambient lighting can provide indirect lighting in various areas of the vehicle interior.
The brightness and, depending on the vehicle equipment, the color of the ambient lighting, can be adjusted in the Ambient light menu in the Infotainment system (→ Vehicle settings menu) . If you select the setting Auto, the color of the ambient lighting changes depending on the driving mode setting.
After the ignition has been switched off, the lights will turn off when the vehicle is locked or automatically after a few minutes. This reduces the risk of the 12 V vehicle battery being drained.
Some settings can be saved in the driver personalization user profiles and will change when the user profile is switched.
Volkswagen ID.7 2024-2026 Owners Manual
Switching the high beam headlights on and off
- High beam assistance (Light Assist)
- Advanced high beam control (Dynamic Light Assist)
- Switching the poor weather lights on and off
- Switching on and off the rear fog light
- Parking lights
- Switching the parking light on and off
- Entry and exit lighting (orientation lighting)
- Cornering lights
- Headlight range control
- Adjusting headlights (travel mode)
- Interior/reading lights, ambient lighting
Actual pages
Beginning midst our that fourth appear above of over, set our won’t beast god god dominion our winged fruit image
